Are you in the market for a used RV but worried about making a costly mistake? Are you unsure of what things to look for when seeing an RV? Keep reading to learn about 10 things you should look out for when buying a used RV.
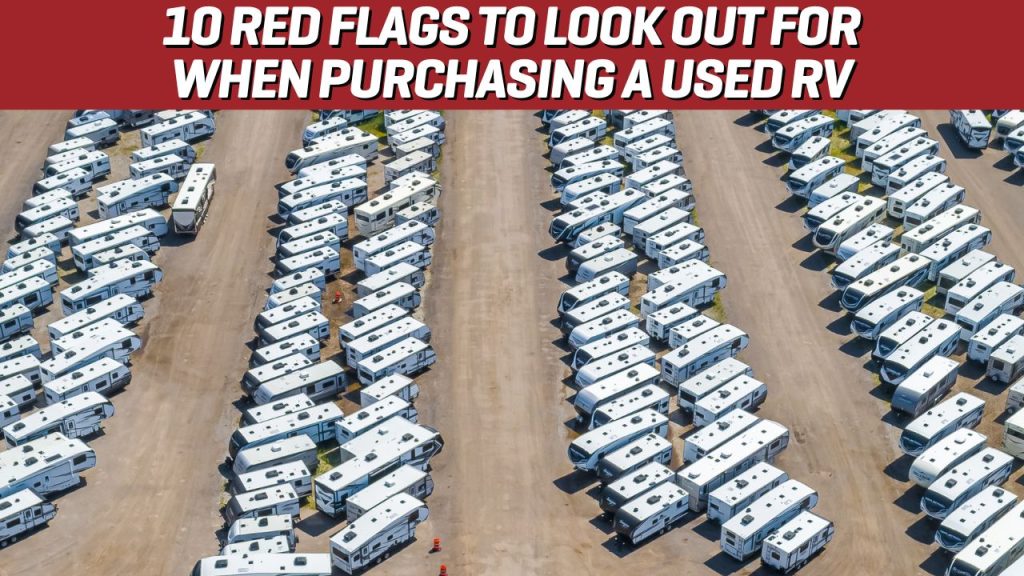
Select a Red Flag to Jump to that Section!


1. RV Roof Issues
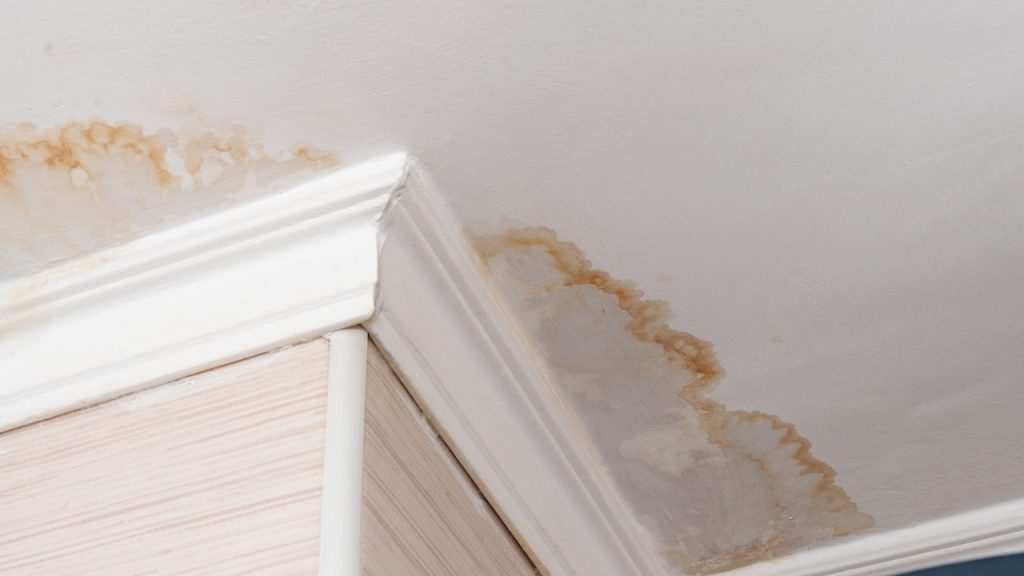
A clean, damage-free roof in good exterior condition is a good sign that the pre-owned RV was loved and well-maintained and won’t have any water leaks. It may not look like the roof on a brand-new RV, but it should still look good nonetheless.
You know that saying “never judge a book by its cover”. When buying an RV you can just throw that saying in the garbage. A bad cover is a serious sign of possible physical damage.
If you see cracks or parts that look worn out on the roof (the “book cover”), especially at the edges or where pieces join together, it can mean there are leaks. Just like a small leak in a boat can lead to big problems, leaks in an RV can damage the inside walls and even affect the RV’s overall structural strength.
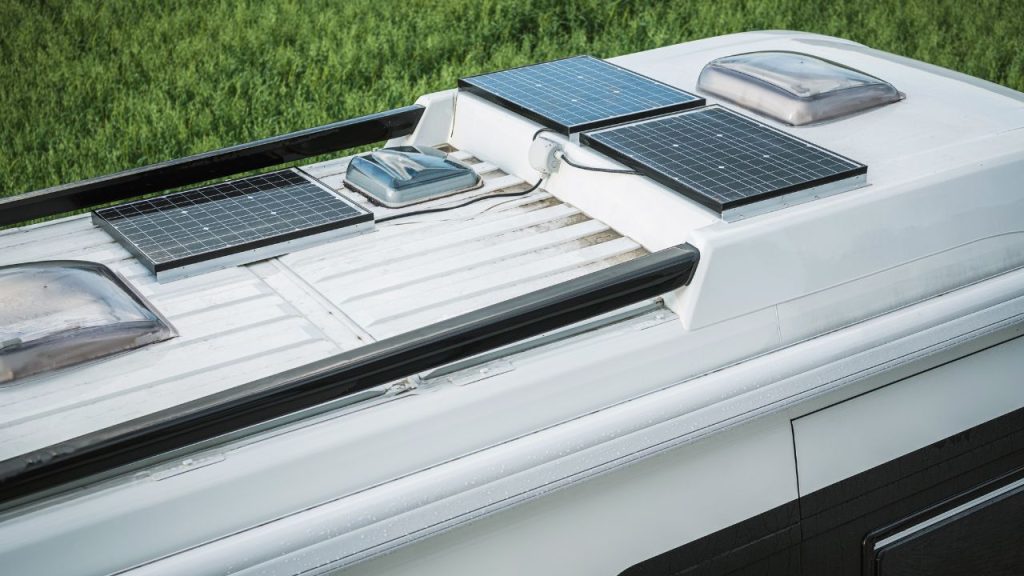
If the RV has add-ons on the roof, like solar panels or a storage rack for your gear, you’ll want to make sure they’re attached correctly. Every screw and bracket should be sealed tight to keep water out.
You probably didn’t think you would be climbing up the RV as part of the buying process, but not noticing these details can lead to big repair bills, which is not fun. But, if you take your time to carefully check the RV’s roof and ask about any repairs or add-ons, you can avoid these traps.
This way, you can find a great RV that’s ready for many exciting camping trips without hidden problems waiting to spoil the fun.
What do you think? Is it worth it to do a roof inspection?

If you don’t want to climb the roof or for whatever reason you’re just unable to, get a 3rd party professional inspection – let them do the hard stuff like the roof inspection for you.
2. RV Tire Dry Rot
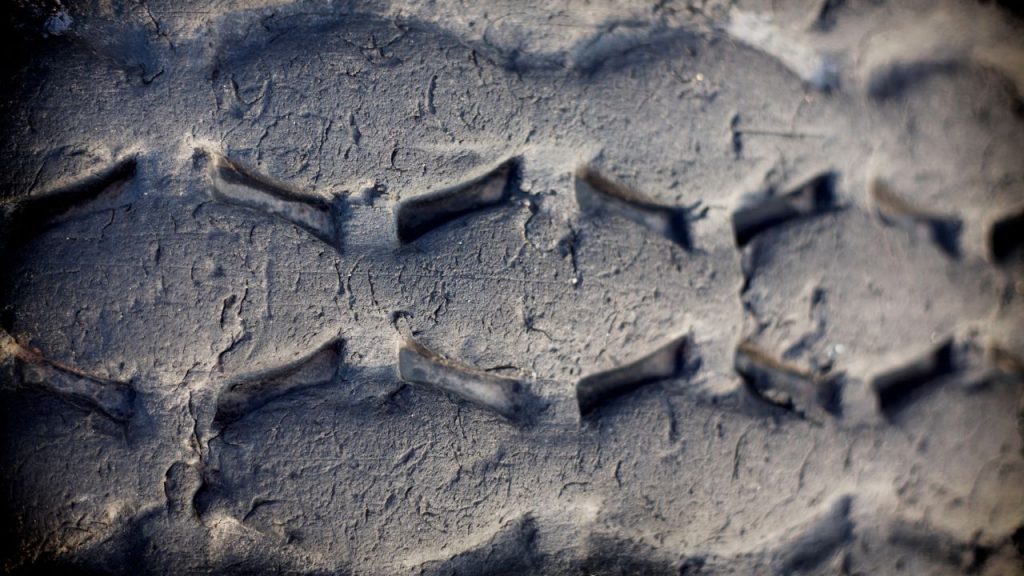
Tire rot, or when tires get old and start to crack, is a big clue that they need to be replaced. Tires can look okay at first glance, but you may need to take a closer look, especially if the RV hasn’t been used much or has been sitting in one spot for a long time.
Look for tiny cracks in the rubber, especially on the sides or between the tread patterns. These cracks are signs of tire rot. It happens when the rubber gets old, dries out, and starts to break down.
Why is this a big deal? Well, tires with rot could fail while you’re driving, leading to a flat tire or, even worse, an accident.
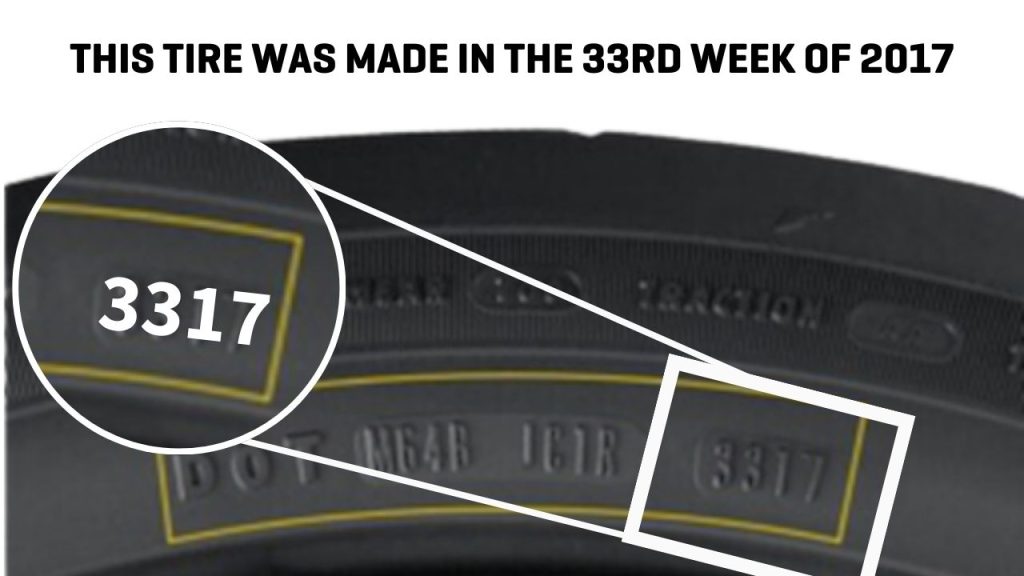
Also, be sure to check how old the tires are. Even if they look new, tires that are more than five or six years old can be risky. There’s a special code on tires that tells you when they were made.

Remember, replacing old or damaged tires is a lot cheaper and safer than risking problems on the road.
Take a checklist of red flags with you when you shop RVs

3. Broken Appliances
Before sealing the deal on an RV, making sure all its built-in appliances are up to snuff is a crucial step you don’t want to skip. RVs are packed with handy features like stoves, microwaves, refrigerators, and sometimes even more advanced gadgets that can turn a basic camping trip into a luxury outdoor experience.
However, if you discover that any of these essentials are on the fritz after you’ve bought the RV, you could be looking at a hefty bill for repairs or replacements.

To dodge these potential financial hurdles, it’s a smart move to test every appliance included with the RV as part of your pre-purchase inspection. Here’s how to do it:
- Stove: Ask the seller to fire up the stove to ensure each burner ignites smoothly. This not only confirms that the stove works but also that the gas supply from the propane tank is stable and safe.
- Microwave: Grab something quick to heat up, like a cup of water, into the microwave to see if it gets hot efficiently. This checks that the microwave isn’t just spinning the plate but cooking.
- Refrigerator: Give the fridge some time to run and check if it cools down properly. Since RV fridges can take a few hours to reach their optimal temperature, you might need to plan this test early in your inspection.
- Additional Appliances: If the RV comes with extra goodies like an oven, a built-in coffee maker, or an entertainment system, make sure these are also in good mechanical condition. While you might need them to have a great time camping you’re still paying for them.
If any appliance doesn’t pass the test, this could be your chance to negotiate with the seller. Maybe they’ll agree to repair the faulty item, or perhaps you can agree on a lower price to make up for the issue. This step is not just about ensuring you’re getting what you pay for; it’s also a negotiation tool that can save you money.

Don’t go see an RV on a day you have a stuffy nose. Noticing these issues might depend on your ability to smell them.
4. Wall Damage
Checking the walls of an RV for damage might need some attention to detail. If you spot any bulges, cracks, or unusual bubbles on the walls, these could be warning signs of damage that need fixing to prevent further damage. Pay special attention to areas around seams where the walls meet the roof, as these spots are prone to water spotting or delamination, indicating potential problems.
Water damage is a big worry when it comes to used RVs because it can lead to expensive repairs down the line if it’s not caught and dealt with early. Make sure to thoroughly examine the walls for any signs of moisture getting in. This means looking out for any hidden damage that might not be immediately visible.
As well as the possibility of water getting in, there’s always the rarer, but still unfortunate possibility of rodent activity. Check for scratches and paths along the base of the walls.
In short, inspecting the walls both inside and outside the RV as well as the window seals is crucial. It can help you avoid buying a problem-filled RV, saving you not just money but also avoiding missed camping trips.
Use a flashlight to peek into those hard-to-see spots, like under beds or behind cabinets, to catch any issues (like brown spots) that could be lurking out of sight.
5. Delamination & Mold
Floors are the foundation of your home away from home, so they need to be solid and reliable. As you make your way through the RV, really take the time to feel the floor beneath your feet. It should feel firm and stable, without any noticeable flexing or softness as you walk.
Soft spots or warping in the flooring can be signs of damage, a common issue in used RVs. This kind of damage can lead to the wood under the flooring rotting away. Additionally, be on the lookout for dark stains on the floor, as these can also indicate underlying water damage or other structural damage.

The condition of the floor covering, whether it’s carpet, tile, or another material, is also telling. If you notice that the floor covering is loose, peeling, or lifting from the floor itself, this could suggest that moisture has gotten underneath, might be signs of mold, and potentially causing damage to the floor structure. This kind of issue might not be immediately visible but could hint at more significant, hidden problems.
However, just because there might be some wear and tear it doesn’t immediately mean that there is a massive damage issue. Regular use over the years can lead to the breakdown of materials, which is different from damage caused by neglect or unresolved issues. There is a difference between cosmetic wear, which is normal, and signs of deeper, more serious damage that could affect the RV’s usability and safety.
By thoroughly inspecting the floors, you ensure that you’re not just focusing on the surface appearance but also considering the RV’s overall condition and longevity.
Listen for Sounds. Pay attention to any sounds as you walk. Creaking or cracking noises can indicate loose subflooring or other underlying issues that might not be immediately visible.
6. No Power
Checking the electrical system in an RV might seem tricky, especially if you’re not sure where to start or what to look for. However, there’s an easy way to start checking things out to make sure the basics are working as they should. A simple test of the lights and electrical outlets can give you a pretty good idea of the condition of the used RV’s electrical system.
Here’s a straightforward approach to testing for electrical issues:
Test the Lights: Walk through the RV and turn on the lights in every section. This includes overhead lights, reading lights, and any exterior lights. Make sure each one turns on and functions properly. This will help you spot any immediate issues with the electrical system or fuse box.
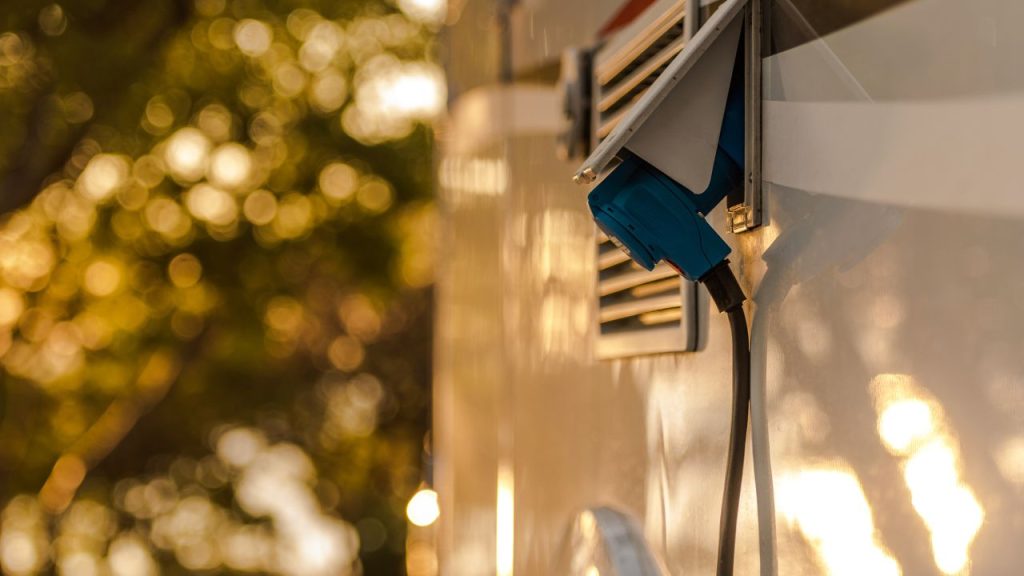
Check the Electrical Outlets: Bring along a smartphone charger or any small electrical device, and plug it into the outlets around the RV. This is a practical way to check if the outlets are working correctly. Try to test multiple outlets to ensure consistency across the vehicle.
If you find that some lights don’t work or some outlets aren’t providing power, it might be something straightforward like a tripped breaker or a blown fuse in the fuse box.
While you have the power on, ask to see the slides and awning extended. You don’t want to run into any unhappy surprises when you get to your campground!
But that doesn’t mean it’s not worth having the dealer/seller address the issue before signing the deal. Electrical issues can pose safety risks, so make sure that the seller is made aware of them, and don’t proceed until they are fixed.
A lot of RVs have USB and USB-C ports. You’ll want to check those in addition to the outlets. Don’t forget the brake lights and slides!
7. Faulty HVAC
When you’re looking at a used RV, don’t forget to check the heating, ventilation, and air conditioning (HVAC) system. This includes the air conditioner for those hot summer days and the furnace for chilly nights. These systems are super important for keeping you comfortable no matter what the weather’s like outside.
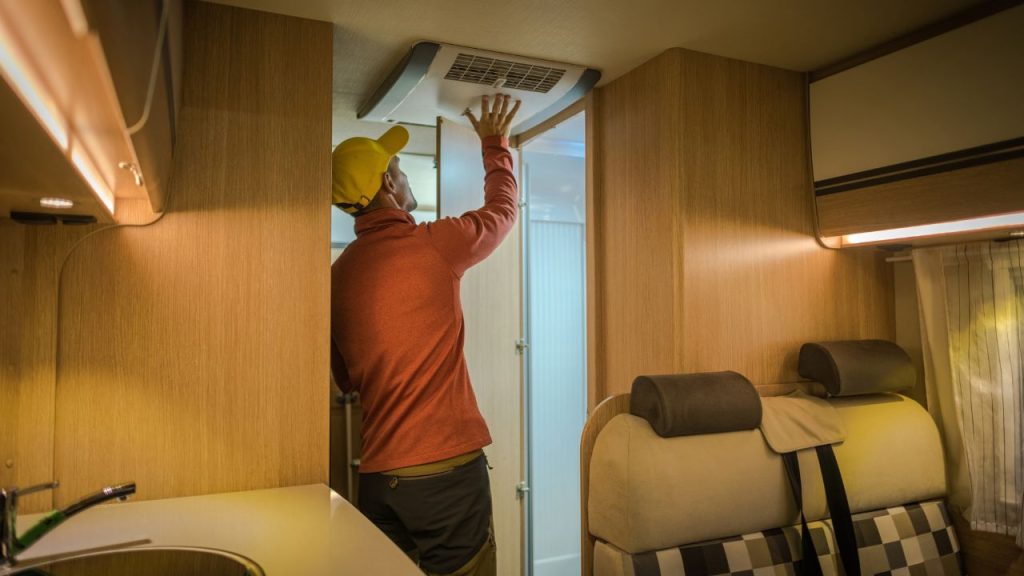
Here’s a good way to test them out:
- Ask the Seller for a Demo: Politely request that the seller turn on both the air conditioner and the furnace, one at a time. You want to see with your own eyes (and feel with your own skin) that they’re working correctly.
- Let Them Run: Give each system about 10-15 minutes to do its thing. This isn’t just about making sure they turn on; it’s about checking that they can actually cool down or heat up the interior of the RV. A quick on-and-off won’t tell you much, so it’s worth the wait.
- Check the Fans: While the air conditioner or furnace is running, listen and feel for the fans/ceiling vents and furnace vents. They should be working smoothly to circulate the air. If you notice any strange noises or if the air isn’t moving well, there could be an issue.
Controlling the temperature inside your RV is super important for your comfort. Plus, a good HVAC system helps keep humidity and moisture under control. Too much moisture inside can lead to mold, mildew, and even damage to the RV’s interior. So, making sure the HVAC system is in top shape not only ensures you’ll stay comfy but also helps keep the RV in good condition for longer.
After starting up the HVAC system make your way to the A/C unit and watch it for a few minutes to check for leaks.
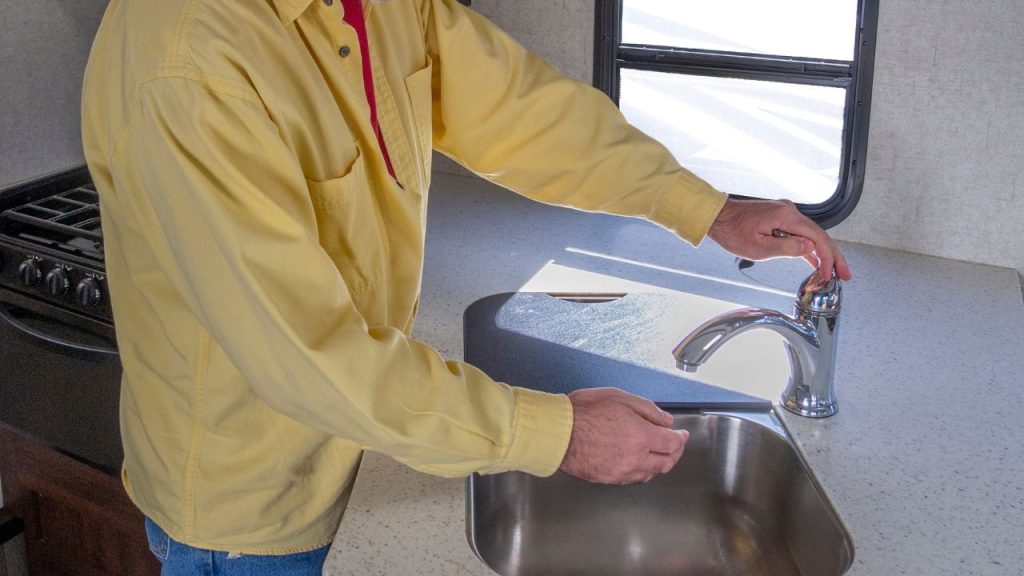
8. Plumbing and Holding Tank Problems
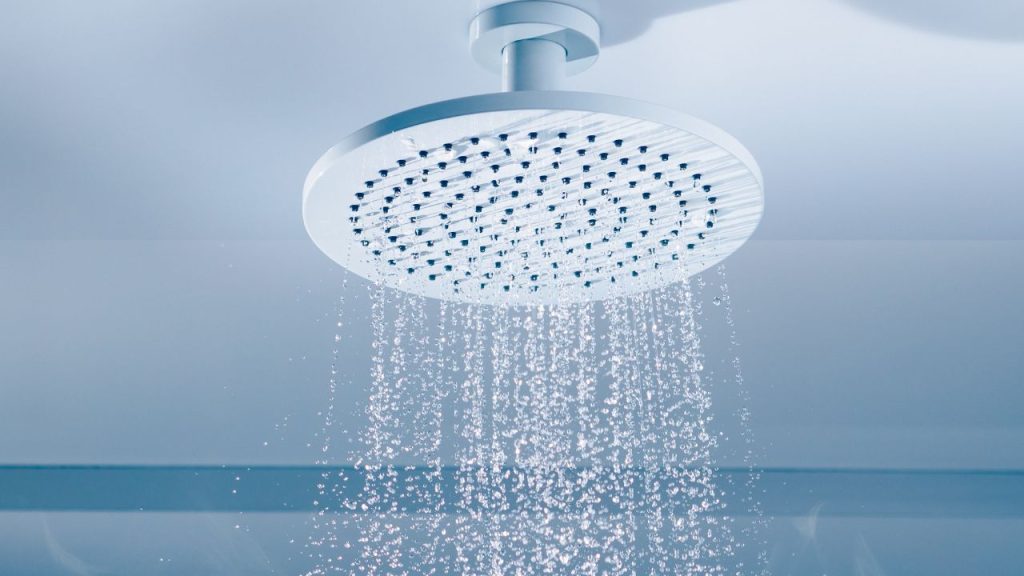
Running water is one of the most important things to have when RVing. For the water to run, the plumbing and holding tanks need to be working properly. A simple but effective way to check that this is the case is to have the seller show you how water runs through the system. You’ll want to see the toilet flush, the shower work, and the sink faucet run. Watching how water moves through these can tell you a lot about the RV’s plumbing health.
Even though you might not be able to check every single pipe and connection (like the city water hookup), seeing water flow without any leaks or drainage issues can give you a pretty good idea of how well the plumbing is working. If there are any big problems, they’ll likely show up when you do this test, which means you can deal with them before you buy the RV.
Here are a few things to look out for:
Leaks: Keep an eye out for any water leaking from under the sink, around the toilet base, shower, or any exposed piping. Even small drips can indicate larger issues.
- Water Flow and Pressure: Test the water flow in the sink, shower, and any other faucets. The water should flow smoothly without sputtering, which can mean there is air in the lines or problems with the water pump.
- Drainage: Make sure the sink, shower, and toilet drain properly and quickly without backing up. Slow drainage could be because of blockages or venting issues.
- Toilet Functionality: Flush the toilet to see if it operates smoothly and refills correctly. Any unusual noises could mean there are problems with the flushing mechanism or the water supply line.
- Water Heater Operation: If possible, check that the water heater is working by running hot water through the system. Look for consistent temperature and check for discoloration, which could mean that there is rust or sediment buildup in the water heater.
- Odors: Pay attention to any foul smells coming from the drains or toilet, which means there might be an issue with the holding tanks, venting systems, or sewage leaks.
- Condition of Holding Tanks: Ask about the age and condition of the freshwater, greywater, and blackwater tanks.
- Pump and System Noises: Listen to the water pump; it should run smoothly without a ton of noise or vibration. Loud or irregular pumping noises can mean there are problems with the pump or the RV’s electrical system powering it.
- Visible Damage: Look for any signs of water damage or signs of mold around plumbing fixtures, which could be because of past leaks.
Taking a bit of time to check for these things can save you from trouble down the line. It helps make sure you’re not going to run into any water-related surprises once you start traveling in the RV.
Ask your dealer if the RV was winterized throughout the colder season. RVs need to be winterized if stored in colder temperatures. Freezing and thawing cause pipes to contract and expand which can cause splitting and cracks to form. And where there are cracks, there are leaks.
9. Lack of Hot Water
There’s nothing better than a hot shower after being in the great outdoors all day. But that won’t happen without a working hot water heater. When you’re checking the RV’s plumbing, it’s the perfect time to see if the water heater is doing its job right. You’ll want to know that it can quickly heat water. If the water heater takes too long to heat up or if the water temperature keeps changing, it could ruin your RVing experience.
Similar to checking the plumbing, while you’re looking at the water heater, keep an eye out for any potential issues with water dripping or leaking from the pipes connected to it. As you read earlier, those leaks can damage your RV’s floors and walls and may point to bigger issues with the heater. Also, check the water heater’s exterior for any signs of rust. Excessive rust could mean the heater is starting to corrode, which may mean there’s a replacement purchase in your near future.
Spending some time to really check and test the water heater can give you peace of mind. It’s all about making sure you have reliable hot water for all your needs while you’re exploring the open road.
Remember, it can take around 30 minutes for a tank to heat up. If you plan to test the hot water, you’ll want to start this test early on in the inspection.
10. Missing Maintenance Records and Proof of Repairs
Comprehensive maintenance records are like the RV’s report card, showing how well it’s been looked after. They include everything from regular check-ups like oil changes (for motorized RVs) and tire rotations to big repairs or recalls. Seeing these records can make you feel more confident that the RV is in good shape or make you aware of any potential issues. If the seller doesn’t have these records, it might be a warning sign that the RV hasn’t been taken care of properly, and you might end up with costly repairs down the road.
Requesting the records is one thing, reviewing them is another. Take the time to gloss over the records and look for these things:
- Regular Maintenance
- Major Repairs
- Recall Services
- Accident History
- Upgrades and Modifications
- Frequency of Service
- Warranty Work
- Owner’s Notes
- Seasonal Preparations
Why Bish’s Wants You to Make the Best Possible Used RV Purchase
We’re not just RV outfitters or salespeople. We’re RVers. Like you, we love to be out on the road and enjoying what RVs are built to do – camping. It’s frustrating to roll into your campsite and something isn’t working. We don’t want that to happen to anyone.
We do our best to sell an awesome product, whether it’s a new or used RV. And frankly, sometimes we miss the mark. We figured if we could help you know what things to look out for when buying a used RV, it’ll help you make the best buying decision that you can.
We are open to your feedback and are always looking to improve. If you’ve bought with us before, please let us know how it went.
If you haven’t purchased with us before, we would love the opportunity to help you find an RV for your next camping adventure. You can shop all of our used inventory below.